Lesson 6: Visuals that move
Camera Angles and Position
In addition to how much of the subject and scene is in your frame (shot size), you can film your subject from different camera angles and positions to convey meaning. These different camera angles and positions and how they may aid in conveying specific meanings will be explained next.
Camera Angles
You can shoot your subject from different heights to convey different emotions. An eye level shot is the most neutral. This means that you shoot your subject how you generally see him or her in real life: at the eye level. You can also use a low angle shot to make your subject look more strong and powerful. This means that you aim the camera from underneath. Alternatively, you can use a high angle shot to make your subject appear more weak and powerless. This means that you film your subject from above.
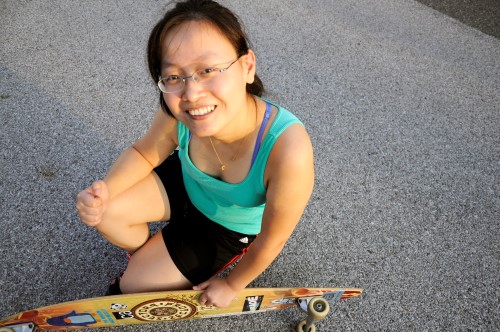 High angle
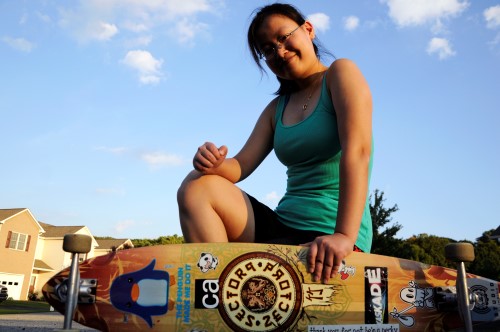 Low angle
Point of view shots (POV)
POV shots can help your audience feel engaged and part of the action. A point of view shot is shot from your subject’s point of view. A POV shot can help your audience feel part of your story and make them feel as if they are experiencing it themselves.
 POV shot
 POV shot
Over the shoulder shots (OTS)
Over the shoulder shots are a type of POV shot. These shots show the position of the subjects and can make the audience feel as if they are seeing one subject from another subject’s point of view. This shot highlights the reactions of the subjects to each other (Artis, 2008).
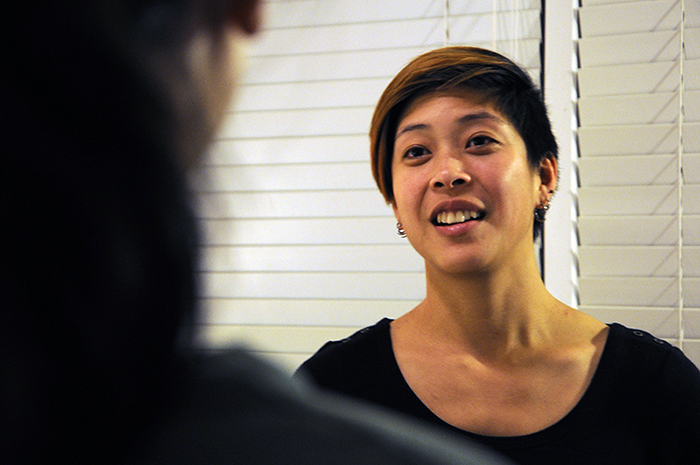 Over the shoulder shot
Please watch the video below to learn more about different camera positions and angles and how you can take advantage of them to convey meaning.
180 degree rule
In the video that you just watched, the 180 degree rule was shortly mentioned. This rule is often applied when you look at sports games on television. Cameras are usually only placed on one side of a football or basketball field, so viewers do not get confused what side the ball is moving towards and what side a specific team is on. When you have two subjects talking to each other you can create an imaginary line (axis of action) using their line of sight (the direction that they are looking at). Your camera can be anywhere on one side of the line but cannot cross it. You should not break this rule unless your camera is moving while you are filming. This movement can give your audience a feeling of direction, which can prevent confusion.
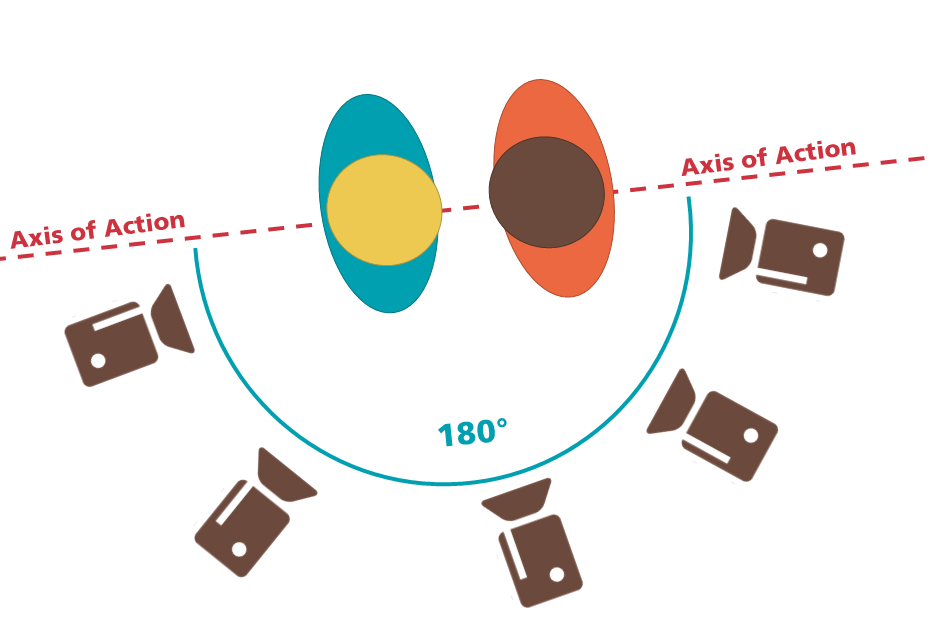 180 degree rule
Reflection activity:
After reading about shot sizes and camera angles, do you think you can recognize them when you see them? Please watch the video on the left and as you watch it, write down the different shot sizes and camera positions that you can recognize. After you watched the first video, play the second video. How did you do?
Assignment 6.1: Camera Shots
When creating videos, people often do not take full advantage of the medium. People often take frontal shots at eye-level and do not use a variety of shots, camera angles, and positions. Video is a great medium to capture action and motion, but it is not always used for these purposes. In this assignment, you will therefore be asked to take advantage of the opportunities that video can provide and create a variety of shots.
Description
Create a video that includes at least 7 different types of shots, camera angles, and positions. Examples are: high angle shot, tilt up/down, extreme long shot, worms eye shot, side shot, rear shot, medium shot, close-up, pan left/right, low angle shot, jump cut and reverse-shot. You can create a sequence of related shots that all tell a single story, but you do not have to. As you create your shots, try to create shots that are as diverse and dissimilar from each other as you possibly can. In addition, think of the meaning you try to convey with your shot (i.e. highlighting emotions or making someone look more powerful).
Each shot should not be longer than ten seconds and should contain movement. Video is a great medium to show motion, so try to take advantage of that. You can use any editing program that you like to combine the shots. PCs usually already have Windows Movie Maker installed and MACs often have iMovie pre-installed. For each shot, add a caption with the name of the shot (i.e. low angle shot, dolly, or tilt). If you do not know how to create captions, there are many tutorials on LinkedIn Learning related to the program you used. After you have completed your video, export it, and publish it on YouTube or Vimeo.
Finally, paste the link to your video in a Word document. Below, type out the names of each of your shots. in 2-3 sentences per shot, write down what meaning you tried to convey how this shot type can generally be used to help convey certain meaning (i.e. Close up: I used a close up to emphasize my subject’s facial expression and to draw your audience closer to my subject on the screen. Close ups draw attention to your subject’s emotions and to specific details on the screen).
To summarize:- Film at least 7 different types of shots
- Import them to a video editing program and add captions
- Export the video and copy the link into your Word Document
- Type out the names of each of your shots and in 2-3 sentences for each shot, write down what you tried to convey and how the shot type can generally be best used to help convey meaning
Submitting Your Assignment
You will submit this assignment together with assignment 6.2 at the end of this lesson. Prepare both assignments for this lesson (6.1 and 6.2) into a single Word file. Make sure the file is named “Assignment 6”. At the top of this document you should have the lesson name, and underneath that should be your name, email address, and the date. Below, write “Assignment 6.1”, add the link to your video, and the names and details about your shots. Do not submit this assignment until you have also completed assignment 6.2.
Grading Criteria
- Video included at least 7 different camera shots with their names in captions (7)
- Explained for each shot what meaning you tried to convey and how your shot type could generally be used to convey specific meanings (2-3 sentences per shot) (7)
Points: 14