Lesson 8: Storyboards
Introduction
Once you have a comprehensive design document, it is often tempting to dive into your authoring software and begin creating screens. After all, you've thoroughly planned your instruction, and are ready to begin developing your program, right? That may be correct. However, there's one more bit of planning that will help make your development process go much smoother. Before firing up the authoring program you need to spend a little time planning how you will structure your instructional materials and how your learners will interact with that instruction.
Never begin a multimedia project without first outlining its structure and content. In this lesson you will do precisely those two things. First, you will outline the overall structure of your program, and then you will outline the content of each of your screens. These things are accomplished by creating a production flowchart and a series of storyboards. The flowchart will show the complete outline for your program, while the storyboards will show the details on each of the screens.
Flowchart
The flowchart (or navigation map) is a visual representation of the sequence and flow of your entire multimedia program. It outlines the structure of the program, showing all of the screens and the connections from each screen to the others. It is useful for organizing and clearly seeing how everything in your program will fit together, and allows you to make decisions on the sequence you want your learners to take through the program. A flowchart is similar to a storyboard, except that it doesn't provide precise details as to the content of the individual screens.
With a navigation map you can see all the possible user interaction pathways and connections, expressed through labeled boxes and directional arrows, and trace them through the hierarchical menu structures and along various screen branches. It provides the logical design from which the much more detailed storyboards will naturally flow. A well constructed flowchart, considering all relevant criteria, will save you from having to restructure things over and over if you realize that the components of your program are not fitting together like you had hoped.
Now, the production flowchart is different from the instructional analysis flowchart you created earlier. Don't get those two mixed up. They serve two completely different functions. The instructional analysis was created to indicate the flow of steps and substeps required to achieve your goal. The navigation map is a visual representation of the layout of your multimedia program, from the opening screen to the closing screen. It also shows the various relationships between all of your screens.
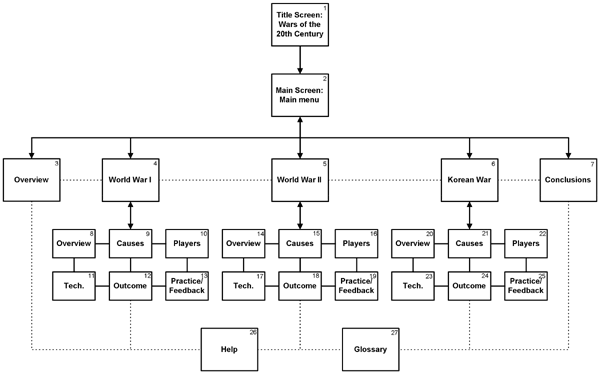
Here's an example of a navigation map for a multimedia program that deals with the wars of the 20th Century:

Notice how there is a title screen, a main menu page, an overview, several topics, and a conclusion screen. Each of the main topic screens leads to several subtopic screens. Also, each of the topics has a practice and feedback section. The Help and Glossary screens are accessible from any of the topic screens.
This flowchart does not describe any graphics or animations on any of the screens. That's what you'll do on the storyboards. All the flowchart does is provide you with a "big picture" overview of the entire multimedia program, and a good idea of how everything will fit together. It also gives you a general idea of how many screens of instruction you will have to develop.
There are several ways to structure the information in your program. Here are some of the more common methods used:
Linear Structure
The web user navigates sequentially, moving from one screen to the next. The linear approach is appropriate when you want the user to visit each page sequentially without skipping around.

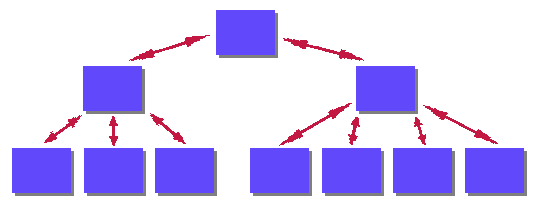
Hierarchical Structure
This layout usually begins with a master page, or home page. This page usually has links that lead to related or subordinate pages; these pages, in turn, contain links back to the home page.

Non-Linear Structure
Web users can navigate freely through the content of the web project, unbound by predetermined routes.

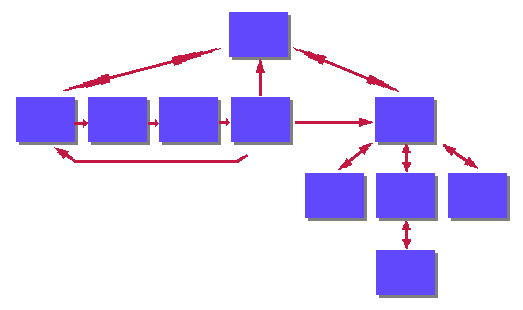
Composite Structure
For the most part users can navigate freely (as in the non-linear structure), but are occasionally constrained to a linear or hierarchical structure for some of the material.

The example given above (Wars of the 20th Century) would thus be considered a hierarchical structure. It could be a composite structure if the subtopics under each of the main topics were arranged in a liner fashion. The main point is that there are many ways to structure the information in your program. It's up to you to decide on the way that will most effectively lead your learners to the achievement of your goal. Does the information in your program need to be accessed in a specific order, or can it be accessed nonsequentially?
Storyboards
A multimedia storyboard is a communication tool used by multimedia designers to map out and organize their project ideas before actually developing their program. Storyboarding refers to the process of creating a sequence of screens to provide an overview of the project that (a) demonstrate the arrangement and functionality of the program elements, (b) document how instructional design theory will be evident in the final product, and (c) delineate the program's navigation scheme. It creates a bridge between the design specifications and the final product. Storyboards allow you to visualize how the final product is going to look and operate, and help ensure that no vital information is left out during the development process. In addition, problems can be spotted on the storyboard and corrected before the final program is developed. If the program is going to be interactive, the storyboard is useful in determining when and where user input can or should happen. Finally, if more than one person is working on the project, storyboards provide a framework that everyone can point to as a common point of reference.
Each storyboard typically describes all of the elements appearing on a single screen (instructional text, graphics, animations, etc.), how those elements will be arranged on the screen, and how that screen will link to others. While creating storyboards, it is simple to rearrange the elements of each screen to better fit the instructional strategy.
Interface development
Part of creating storyboards is determining an appropriate and consistent interface to use in your program. Buttons and options need to be designed in a manner that is logical, easy to read, and easily navigable by your learners. Developing an consistent interface usually involves creating the basic visual elements with a painting or drawing software program such as Photoshop or Illustrator.
![]()
The interface is not the information you are trying to communicate, but rather the shell that allows the user to approach and interact with the information. The interface is what the user sees and uses to navigate through the product. Even if the content is good, if the interface is poor then the overall product will be affected. Be consistent! It is important for all of the screens in your program to have a consistent look and feel. In most programs there are buttons that appear on many or all of the screens, such as Home, Help, Next, Back, and Quit. If so, they should remain stable throughout the program. In other words, if your "Home" button is in the bottom right corner of the screen in one section then it should remain there in other sections. Or, if you start using green arrows as navigation links, then don't start using blue arrows halfway through the program.
Creating Storyboards
When creating a storyboard, there are basically five things to consider. For each screen you want to describe:
- The elements that will appear on the screen, including the background, text, graphics, animations, video clips, and audio clips.
- How the elements will be arranged on the screen.
- What the learner will be interacting with on the screen.
- What navigation options will be available on the screen.
- How instructional design theory is evident in the “look and feel� of each screen.
Storyboards can be created on paper, in a word processor, in an authoring application, or in specific software applications designed for storyboarding. A typical storyboard includes a space to sketch the screen layout, and a space to describe all of the elements that will be included on that screen.
No matter what authoring program you are using to develop your multimedia
program, the program will basically be made up of a sequence of screens. A
flowchart allows you to determine how your learners will progress through
the program, what order they will encounter the instruction, and how
everything will be linked together. Storyboards go a long way toward
ensuring a consistent, concise, and appealing interface and presentation
of content. Together, the flowchart and the storyboards provide a
graphical representation of the complete multimedia project. In addition,
both of these elements will help to streamline the development process.
Multimedia Design: Flowchart and Storyboards
In the first step of your instructional strategy you sequenced and clustered your objectives, and then you went on to determine the instructional material that would best fit each of your objectives. Now it's time to think about how your users will interact with that information within your multimedia program. First you will create a flowchart that indicates the flow of your program. Then you will create storyboards for each of your main screens.
As you go through this process, keep in mind Gagne's Nine Events of Instruction, and use them to help guide the sequence of events in your program. If you recall, the nine events are:
- Gaining attention
- Informing learner of objectives
- Stimulating recall of prior learning
- Presenting the stimulus material
- Providing learning guidance
- Eliciting the performance
- Providing feedback about performance correctness
- Assessing the performance
- Enhancing retention and transfer
The nine events might not necessarily correspond to the number of screens in your program; a given screen might incorporate one, or more than one, of the nine events. For example, in the example given earlier on wars of the 20th Century, the first event might take place on the "Title Screen", and might involve an animation or video to get the learners' attention. Events 2 and 3 might take place on the "Overview" screen. Events 4 - 7 would take place on the various topic and subtopic screens, in addition to the "Help" and "Glossary" screens. Event 8 would take place outside of the program, and might involve a paper-and-pencil test. Finally, event 9 would likely take place on the "Conclusions" screen.
Step 1: Flowchart
Create a flowchart that indicates the sequence and flow of your multimedia program. There's no standard way to go about doing this, but your flowchart should indicate all of the major screens and the connections from each screen to the others. Think about the major sections you will have in your program. Then, think about any extra sections you might have that do not logically flow from your strategy. You may want to add a "Help" section, or a "Reference" section. These don't necessarily relate directly to your goals and objectives, but may be things you want to include in your program for the benefit of the learners. Also, number each box in your flowchart - you'll use that number later to match each box with a storyboard.
Use any means you wish to create the flowchart. If you create your flowchart in a program other than Word, you will need to insert the completed flowchart into the storyboard document (see below). All of the various flowcharting programs have ways copy images into Word, either by cutting and pasting or by exporting the flowchart and then importing it into Word.
Step 2: Storyboards
Once you have a flowchart, create a storyboard for each of the major screens or events in your program. The storyboards should show the general screen layout, indicate where each element you want to use on that screen will be positioned, and indicate the event of instruction that is addressed by the information on the screen. You do not need to create a storyboard every time something minor happens on a screen. For example, you don't need to create a storyboard just to show a mouseover effect, or something flying across the screen. In fact, animations can be indicated using arrows and other annotations within your screen sketches. However, if you have something major happening on a screen, you should probably have a storyboard to document it. This means that you will likely have a storyboard corresponding to each box in your flowchart.
We have provided a storyboard template for you to use when creating your storyboards. The template includes ten blank storyboards. Use one storyboard for each major screen in your program. If you need more, use the copy and paste features of Word to add them - one storyboard per page. Also, notice that the first page of the template is blank. This is where you should insert your flowchart, so that everything is together in one document. The first page is in landscape mode to allow more room for your flowchart across the page.
Here's a link to the template:
Based on the template, each storyboard should include the following information:
- The project title.
- The date
- The screen number. This number should correspond with the number that appears in the flowchart you created earlier.
- A brief description of the content of the screen, including the event(s) of instruction that are addressed by the information on the screen.
- A sketch of the screen layout that indicates the arrangement of all of the elements that appear on that screen.
- A description of the text attributes. This does not mean the text itself, just a description of the text properties, such as typestyle, size, color, etc.
- A description of any still images that will appear on the screen.
- A description of any moving images that will appear on the screen, including animations and video clips.
- A description of any sound clips that will be included on the screen, including speech, music, and sound effects.
- A description of any interactive elements that will appear on the screen.
- A listing of the screens that lead to that screen, and the screens that are accessible from that screen.
If you have content on different screens that is similar, you do not need to create a separate storyboard for each one. Just create a single storyboard and indicate the screens on which the layout repeats by adding those numbers at the top next to "Screen:". For example, in the flowchart given earlier on wars of the 20th Century, the subtopic screens (Overview, Causes, Players, Technology, Outcome, Practice/Feedback) repeat beneath each major topic. It is likely that these screens would be similar in appearance, so you could get by with creating only six storyboards for all of them. If you do this, write the numbers of the screens covered by that storyboard at the top. In this case, if you created one storyboard for all three of the "Causes" screens you would write "Screens 9, 15, 21 of 27" at the top. If you do not have similar content on different screens, then you may not be able to do this. For example, if you were doing a program about changing a flat tire, it is likely that the content would be different for each section of the program.
You can use the drawing tools within Word to sketch your screen layouts. They do not have to be artistic masterpieces. The purpose is to indicate how you envision all of the elements appearing on the screen and interacting, not to show off your drawing skills. If you need to indicate a button, you can simply draw a rectangle with some text on it. Or, feel free to add clipart to spruce them up. If you prefer to hand draw your storyboards (for that more personal touch), you can scan each image you draw into the computer, and then place it in the sketch box on the storyboard sheet. You may also choose to use something like PowerPoint to create your storyboards. If you do this you will need to make sure all of the required information for each storyboard is included somewhere (such as in the "Notes" field).
Here's an example of a storyboard for the "war" example given earlier. The sketch was hand drawn and imported into Word.
When you are finished creating your storyboards, make sure to paste your flowchart at the top. If you do this correctly, the first page of your document should be the flowchart, and then your storyboards should begin on page two. When you save the Word document containing your flowchart and storyboards, name the file "mmstoryboards.doc" Do not add it to your design document.
Submitting your Flowchart and Storyboards
The flowchart and storyboards should be submitted together as a separate document from your design document. Once again, this document should be typed up in Microsoft Word. At the top of the document you should have the title "Flowchart and Storyboards". Underneath that should be your name, email address, and the date. When you save the file to your computer at this point name it "mmstoryboards". After you have saved your file, go to the student interface and submit your assignment for grading. Click here if you need additional information regarding submission of your assignment.
|
Assignment:
Flowchart and Storyboards Grading Criteria:
|